The 917 is legal for sure!
Zack
You are not logged in. Please login or register.
The NASTE Forum → Posts by Wanabgts
The 917 is legal for sure!
Zack
How do we get ahold of him if we want to purchase something Bill?
Zack
This is my kinda race night! PGE and Classic 2. If anyone needs a quick PGE car I have many!
Zack
Rico, thats the beauty of it. We only have to bring the groupc cars. They are bringing all of the cars they race. We all get a taste of whats out there without worrying about rules.
Zack
I have to work. so I'm out also..
It's a month out, what better use of PTO?
Zack
Me and that red lane were getting along nicely. I set the Track record bar as high as I could!
Rico, you missed out on the touring cars but they were great. Even the slower ones were very nice to drive.
Zack
Al, the only revision to the Div.II Class is the eligible years (revision 1965) to 1976, and the rear wheel width of 8mm matches the max. tire contact patch width (same language as used in the Div.I rules).
Bill, are we going to run some kind of grace period on swapping the cars over? Just curious as next week these cars are on the schedule to be raced.
I have ordered some different wheels and tires for classic 2, but I feel in general the cars will be a little slower with a narrower wheel. So I want to know what to bring!
Zack

Rules for event are as follows:
Scaleracing Trans-am rules:
Handout Slip-on tires are available
Stock gearing of 11/38
Prototype cars can be run with the above gearing, but if performance difference is noted we will score them separately. There should be plenty of cars to go around.
Scaleracing BRM Mini-cars:
Trued tires allowed, otherwise completely stock.
Policar f1:
Aluminum rear wheels and slip on F22 tires
No weight
Screw tuning etc allowed.
NASTE club car rules:
Class 16 - Sportscar Era Class - Ground Effect Era (GFX)
Ground Effect Era (GFX) - Full fendered sportscars from 1981 through 1993 which ran in FIA, IMSA, or SCCA sanctioned events. Any motors (23k limit), tires, driveline configuration, or chassis material may be used. Bodies must be injection molded or resin cast and not vacuum molded. Thunderslot brand RTR cars are NOT eligible for this class, but their driveline components (wheels, axles, gears, tires) and guide assembly may be used for tuning
Typical car for this class is a prepared Slot.it Group C car.
I have been working on this with Alan for some time. The goal here is to have a format in which we all can race without the problematic differences in club rulesets. It is not perfect, nor can it be and make everyone happy. I selected the GFX sports car class for us to bring along, as I feel most of us have well performing versions of this car. I know Al has three.
I wanted to keep it to a 1 day bang, so we packed the day with some exciting races I think everyone will enjoy. The Enduro specifically will be Trans am and mini cars combined. I think overall, it will be a blast!
If you can make it, please let me know, as we will be gauging interest in the event to make sure appropriate time and cars are available. I am more than willing to provide a vehicle with which to car pool I can take at least 3 passengers along.
Zack
Great layout Mitch, thanks for hosting the proxy it was a great way put laps on a new track. It was a nice releif to have my rubber cars work well at the end of the day!
Zack
I would love to come by and check it out!
Zack
Well I got my hands on one of these before they hit most sites.
Definitely some weird things going on with Scalextric being the distributor.
Things to look out for.....
1-There are set screws in the motor mount holes, to help keep the motor in position. I almost broke the pod trying to get the motor out before I realized they were there. I have no idea why they didn't just put regular screws in there....
2-They have full threaded screws in the pod mounting holes from the factory, so even when you back them out you basically have no pod float. I replaced them with the normal slot.it partially threaded screws and it is much better, but still tighter than the gt40.
3-It comes with a 23k like most of the GT40.
4-It came with all the front axle height hardware which is awesome, but out of the box the guide was maybe 3mm in the slot. The front tires are so large that even adjusted up the tires hit the body before the guide is fully seated. They pretty much must be turned to work properly.
5-Plastic rear wheels as with all Policar.
6-The Ferrari logos are just covered by stickers on the sides because of licensing, and the front one is under the number tampo, so I won't be unearthing that......
All said though, it is the exact same guide to rear axle length as the gt40. It is 2mm wider on the same wheels, and .5mm lower. The body is also extremely light at only 13.6g. Will be awesome to have another horse in the race.
I think its going to be able to run with the GT40, I have mine completely prepped to test against mine on Thursday!

Zack
Some cool shots in those videos Bill!
Rico, I'm glad you like it. It's a super fast car! I got another one to sort out from Doc this week...
Zack
Thanks for racing last night Al, and everyone else who showed up!
Zack
I got to run some laps here a few weeks ago. What a cool track.
Bill, you have done a top notch job getting it going!
Zack
I am going to try one out. Also looking for a NSR GT40 to see if I can get that car on pace with my other.
Zack
For those of you who want some variety in the Classic 2 category. Pendle has the white kit Policar Ferrari 330 in stock, and shows more of the colored ones coming in within the next 5 days. Only a matter of time before we can get them easily here as well.
I don't see any reason why this car shouldn't be able to compete with the GT40, unless it ends up being much narrower somehow...
https://www.pendleslotracing.co.uk/poli … e-kit.html
Zack
I haven't been to that event in years! It is always a good time.
Zack
Wow, super cool Zack. Excellent write up. What I don't understand is when I do these same tweaks the results are not the same as when you or others do them. I thought I used to know how to make a car work pretty well but lately the results just aren't there, so I take my hat off to you.
Rico
I think the key is just to really take your time with it. I probably spend 30m just fitting the body.
In some cases not having a track may be helping, i don't get impatient and just start driving it!
Thanks for the compliment Rico, racing these with you should be a blast. I still can't believe how fast you got the Alpha to go!!
Zack
Link to my quick youtube review of this car. I think with minor tuning it's going to be very good.
The motor is loose in the chassis, the wheel inserts are loose, and the axle was bound. But it should sort out well!
Excuse slight terminology errors it was one take!
Zack
Not a problem, I hope it helps some of you. I have no problem helping people in the club out, helping each other out is part of what's fun about being part of one.
After all, you now know what to do....but you still have to do it better than me!
Zack
FINAL ASSEMBLY!!! You almost have a fast car now!
First thing, I omit the front bushings from the axle. I have found they cause signficant binding, and on a lot of cars actually keep you from being able to get the guide all the way down. Instead just use the upper and lower front axle screws.
I also add another 3g or so between the pod and right up by the guide, see pics for placement.
Take these out if they are still in there after this work....
Next, I recommend cutting the motor shafts. This can be done before the motor is glued or after. Just cut them enough they can't interfere with the tire. The tires grow a decent amount on an AIR wheel, and any rubbing will cause you problems.

I also use Slot.it Soft braid on all these smaller cars. They are just so light in the front that even the stock braid when fluffed tends to hold the car at a higher ride height.

I keep the braids completely flat, and the pod snug when setting the front axle height. I usually set it so the wheels are full touching which on the copper tape will mean they are just barely on the track surface.
For the pod screws, I run washers on the front screws and NONE on the back. DO NOT OVER TIGHTEN the rear screws without washers or they will crush the chassis.
Settings again in summary for STARTING: From SNUG, never fully tighten.
Front body screw -1/4
Rear body screw -1/4
Front pod screws -1/4
Rear pod screws -1/2
Final weight should be between 61.5 and 63.5 G.
Voila, you have a fast slot.it Mclaren. You may need to tweak the screw settings or clearance more as needed.

In general if you keep these principles I think you will have a fast car:
It should be as low as possible, wide as possible, and as free moving as possible.
Hopefully this helps some folks,
Zack
Last steps are to clearance and trim the body for float, and mount it all up.
I use a light sanding bit and a hand file for most of the work. In general, I have found that the more you can free up the body from the chassis, the more grip you will be able to generate.
I start by removing the body to chassis tabs along the outside of the body.

I then sand in the areas shown, using the chassis to test how much clearance is there. Be careful and go slowly as to not sand through the body. The rear section is to clear the motor movement with lots of pod and body movement. You will need to test fit this when the car is all back together and make sure you have taken enough off.

When mounting the body I use a Slot.it Brass Flat head screw in the front. This allows you to finely tune how much "body roll" you get on the chassis. I find that somewhere around a 1/4 turn out from snug is best usually.
On the rear I use the stock washer and tapered screw, and also leave it about 1/4 turn loose.
Front:
Rear:
Again, I test fit the body to the chassis often during this process. To make sure the proper movement is allowed without interference to the wheels and tires/chassis.
Next up is wheels and tires.
On most of the Slot.it cars, I usually move the rear wheels to the front of the car. The stock wheels are only 8mm wide, and this just doesn't cut it most of the time.
On the McLaren, because of the extremely low ride height. When you get the body float where you want it the tires tend to rub in the front. So I cut about 1mm total diameter off of them on the truer. Coating them in nail polish afterwards also helps with any potential rubbing not bleeding much speed.
*****DISCLAIMER***** If you don't own a proper tire truer, I recommend getting one. NOTHING has helped me more when trying to build smooth, fast cars. This particular one is a Scaleauto, and while has some disadvantages like not being very good with plastic wheels, one thing I like about it is that is it very easy to match the diameter of multiple tires. Take a break buying cars and buy a proven truer, its worth it.


Surprisingly some of the alloy wheels even aren't that true in places. So I quickly run a file over the mounting surfaces to make sure there are no high spots.

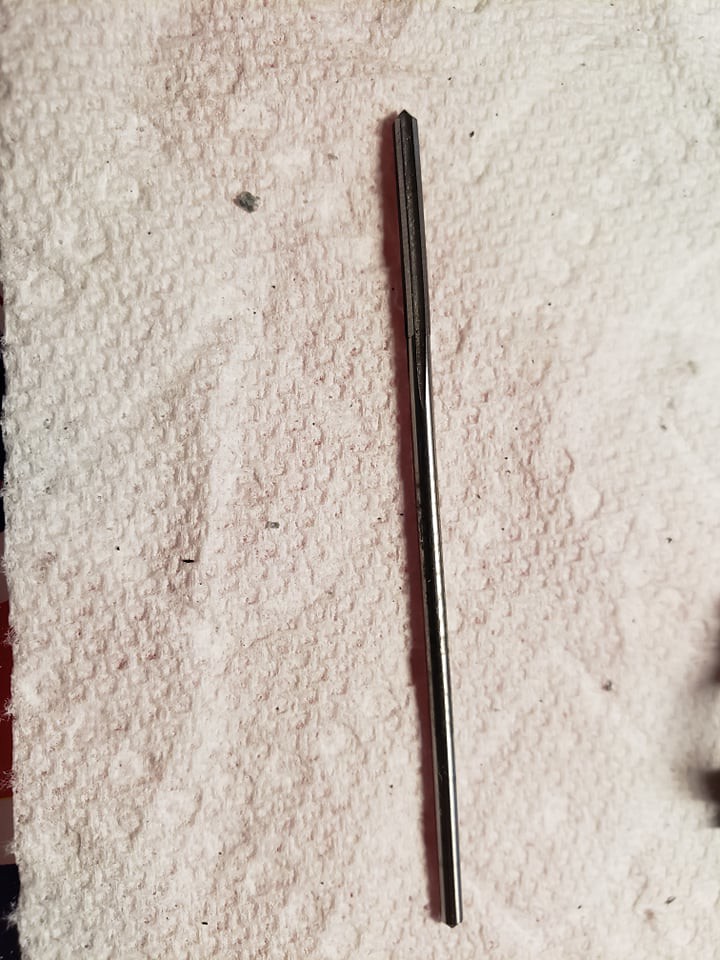
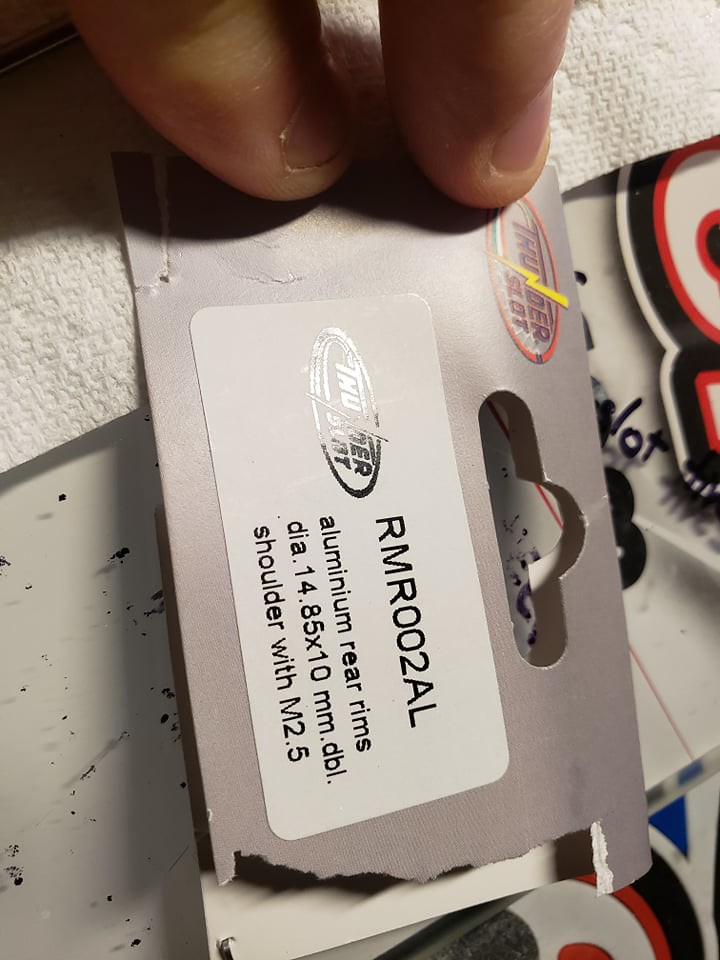
The wheel I have chosen for the back of the car is the Thunderslot 14.85x10mm wheel. This is the only 10mm wide AIR wheel that fits on the back of the car with no rubbing. So I recommend it.
A lot of the time you can get the wheel right on the axle with a little force, the thunderslot axles are just slightly smaller than the slot.it ones. I found this chucking reamer on Amazon which is 3/32 of an inch. It was about 5 bucks.
Holding it with vise grips and twisting the wheel on shaves off just enough for a perfect fit on the Slot.it axle....

On the rear tires I simply true them down until they are perfectly round, and no more. With these wheels the spur gear will be pretty low. So mounting the tires so that minimal rubber has to be removed is best.
Alright time to finish up this motor pod!
As I said in the previous thread about preparing the pod. I have found that installing the motor, even with screws, tends to make the pod twist yet again. So I have found it the best practice to open up both ends of the motor holder on the pod. Insert the axle in the pod to help set mesh, and then simply glue the motor in place.
Also in the previous thread you will see I take a small amount of material off of the bushing holders, so that a small portion of the bushing is protruding. This helps alleviate binding. I believe gluing the bushings in after they are aligned can help, but this can be tricky to do right, so I recommend skipping it.
This is the lead that I use in the pod, I bought 5 rolls of it for $9 dollars on Amazon. I believe it was advertised as fishing gear. Anyway, I fold up three layers of it which weighs about 1 gram and then glue it into the prepped slots in the pod.
You may be able to use adhesive lead here, but I think the Shoe Goo actually helps stiffen the pod. So I don't use it here.

This is what it should look like when your done!

The first step on pod prep. All the new Evo6 chassis have 6 pod mounting points, I have never had success with the cars using any more than the 4 main screws. I believe this is because the chassis's are somewhat flexible, and by having these wings on the pod it will actually help the car lift the inside tire off during cornering. Something you don't want if you looking for maximum grip at the back of the car.
To make sure they are not interfering with the handling, I simply cut them off and sand the pod flat.
Before:

After:

After that is done I remove the magnet locking tabs on the middle two slots. I end up only installing around 2g of weight on the pod, but I want it to be as low as possible. So removing these tabs lets the ballast sit right down in the bottom of the pod.
Before:

After:

I smooth this out a bit with the tip of a file before gluing the ballast in. More on that in the next post!
Zack
The NASTE Forum → Posts by Wanabgts
Powered by PunBB, supported by Informer Technologies, Inc.